Lathe Stand

So.... I had purchased a good old Beaver/Rockwell lathe, but the stand that came with it was built from 2x2 lumber and a light breeze made it shake. Hunting on-line I found several stand plans, but none I was really happy with. They either looked too light, or were somewhat high end looking. Rather than spend a lot of time building a stand that is a high end piece of furniture that will live in an unheated garage, I wanted to spend the time turning. So I came up with a solid, functional design built out of dimensional construction lumber. All hail dimensional lumber.
Requirements:
- Quick & Easy construction and assembly.
- Solid / Stable / Wide base
- Correct Height
- Easy Power for Lathe/Lights/etc.
- Additional Storage was not a major factor in design consideration.
- Weight for stability
My rough sketches/dimensions are avaialble on the Plans Page.
My Thought Process:
- Determine requirements for size. I determined the size of the stand based on the lathe.
- This lathe has a 4' long bed, and is 6 inches front to back across the bed. This meant the top had to leave enough room to attach to the stand, provide a space to feed the belt for the motor that didn't interfere, and leave room for bolting the lathe. I also wanted a bit of overhang so that the shavings didn't get into any crevices, and to make it easier to move/lift.
- The height needs to place the headstock at your elbow. My elbow is about 42" from the ground. From the base of the lathe to the centre of the headstock was around 7 inches. Since I was adding a solid top of 1.5" I needed to take that into account during my math process. Stand including top needed to be 32" tall.
- Width of the base was determined by figuring out the largest piece I can turn on this lathe - since it is a gap bed lathe I get a little extra. Maximum diameter piece is around 12". The thought process behind this was to make the base wide enough when I pushed it against the wall, I still had ample room between the wall and the piece I was working on.
- Easy Assembly and strength - to me meant boxes that assembled to the side using through mortises/tenons. To be even easier, using dimensional lumber meant I could make the basic forms without having to do an excess of mental math.
- Weight - meant an area that could be loaded with sand easily, that was clean and wouldn't make a mess. A 'box' at the bottom was perfect, and could double as a shelf.
- I opted to add the motor below,on the shelf to help keep it clean, and reduce the footprint. The other option would be to have hung it off the back of the stand. I also have a double mandrel with 4 pulleys on each end that was included when I purchased this lathe - I wanted the option of adding it back in later so increase the available speed ranges.
My Construction Process:
I settled on 2x 10' 2x4s, and 3x 10' 2x10s, plus some 3/4" plywood to enclose the weight box with. Sand I happened to have on hand (about 3x 5 gallon pails).
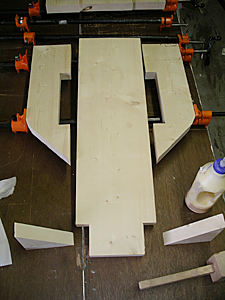
The main centre section of the sides were a section of 2x10 - with the top the same width, I opted to cut a rebate at the corners to fit the box that formed the top. Using a scrap piece of 2x4 I marked out the area and removed it. The wide base was made by adding an additional section to the bottom area - about half the height of the main section with a taper at the top to prevent injuring myself. The cutout for the bottom weight box was made on the additional pieces because they were easier to handle being smaller. I used a scrap end of 2x10 to measure the cutout. Cutout placement was determined by the need to provide clearance for my feet while standing and working (about 6 or 8 inches). I then glued two identical sides up.
After this, I created the two 'boxes'. Four feet in-between the sides provided ample space for the belt, and room to bolt the lathe down without the bolts hitting other hardware.

To form the bottom 'box' for the sand, I cut 2 sections of 2x10 4'3". I screwed 2 'ends' inset by 1.5". This gave me a box with tenons that I inserted into the through mortises on the sides. While I could have used just a 'front and back' and skipped the 'sides' on this box, putting the sides in meant I could easily attach the bottom section keeping everything square and spaced without requiring any assitance. It also made securing the bottom plywood easier without having to worry about sand leaking out.
I cut 3/4" piece of plywood to fit the bottom of the weight box, and 1 1/2" deck screws to fasten it. I then fit the legs to the box, and used 2 1/2" deck screws inserted from inside of the box.
With the bottom and sides together, I measured and attached the 2x4s at the top. I added 3 cross-sections equally spaced to strengthen and stabilize the top.
I then screwed on a section of 2x10 to the top, providing about 2" of overhand on the left and right sides. I sat the lathe on top, and marked it's final placement. Using a plumb bob on the step pulley of the lathe, I determined the size/location required for the hole required through the top to feed the belt, and cut the section out.

To make speed changes easier, I chose to hang the motor from a hinge - using the weight of the motor to keep the tension of the belt. Lift the motor, change the speed. I added a piece of 2x10 screwed to the back to get a height that worked, and an old door hinge to connect the riser and motor mount (removable pin makes it easy to temporarily remove the motor). I have found however, that this has a tendency to cause the motor to bounce a bit - likely due to the age of the belt being used. I have recently purchased a section of link belt and will be upgrading the belt. If this doesn't work, I will likely add a section of 2x4 with a mortise and use a wedge to hold the motor platform steady. I may also finally break down and install the double ended mandrel. In this case I would mount the motor upside down, and hinge the mandrel with step pulleys where the motor is currently mounted - using a wedge or similar system to pin it in place.
Once all of this was done, and I was happy with the location of the stand I then filled the bottom with sand for weight. Rather than spend any additional money I used some scrap 1/2" on top since it was primarily to enclose the sand and be used for light storage.

My final step was to rewire the motor. I purchased 14/3 heavy gauge, weatherproof wiring from a local hardware store (couldn't find it at the Borg stores) and wired the motor to a light switch, leaving extra length so I have the ability to rewire if required down the line. I then wired a generous length from the switch to reach either of the two closest outlets. I have since added a power bar to the side of the leg, and use that as my main power, with my lathe switch plugged into it. Placement of the switch here allows for safety when starting up and testing clearance. I am out of the path of the flying object should there be an issue, but it is still within easy reach when working.
I have been using this stand for several years now, with no issues. Should I ever have to move it, I have the option of removing the sand, or I could use a couple scrap pieces of 2x6 lumber under the bottom shelf and a wheeled two ton car jack for a short move.
Final thoughts:
- When measuring the height of your bent elbow, wear the same footwear you will be most commonly using when turning. I have a tendency to turn wearing my cowboy boots because it is almost impossible to get shavings in them. However - they make me 2" taller......
- Wide legs like these are not always easy to get level without any rocking on an uneven floor.... I hammered a nylon levelling wedge under the front right corner, and with the weight of the sand have never had an issue, But if there is a next round, I would consider:
- using commercial floor levellers
- cutting out an arch in the middle
- using a 2x4x4 piece of wood set under each corner to raise the middle section from the floor.
So, there it is. A quick weekend project, that produced a sturdy, heavy duty lathe stand. I have no complaints so far, and have only found I occasionally have to consiously tuck my foot around the front of the leg if I am doing something odd in the headstock area. It doesn't look like a piece of fine furniture, but I don't worry about it getting damaged and I got to spend more time turning instead.
Hope this is of some help to those looking to do the same.
All Materials not credited to other authors is (c)2003 - 2008 Paul R. Morin.