Ingredients/Materials:
- Boiled
Linseed Oil. See your hardware store. Read the
label…this stuff is not benign.
- Turpentine.
Again, see your local hardware store. Again, read the can.
- Asphaltum.
This is the mystery ingredient that’s not too hard to find
once you
know what to look for. There are many kinds of asphalt, both natural
and those that are byproducts of oil refinement. However, you do NOT
want driveway sealer, roofing tar, etc.
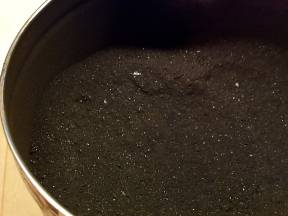
The asphaltum you want is
also known as Gilsonite (a trade name), asphaltite, and uintaite. It is
a natural, resinous hydrocarbon mined from western United States. It is
brittle, a dark brown color when crushed into a powder, and melts about
300-400F, depending upon the grade. Because it’s used in
etching and
lithography, you can find it at larger art supply stores. They usually
know it as “powdered asphaltum.” Some pyrotechnic
supply companies
apparently also sell it. Some gun enthusiasts that make their own
bullets/shells also use it.
I found mine online from http://www.rembrandtgraphicarts.com,
in the intaglio supplies section. They sell it in
“lump” and “powder”
form for $2.25 and $2.40 per pound respectively. However, the
“lump”
form is just a more granular, lumpier powder. Next time, I’d
buy only 1
lb. of the “powder”, instead of the 2 pounds that
came in a tightly
sealed metal can. Unless I start japanning daily, even just 1 lb. will
last me a lifetime. Again, research the hazards of this
stuff…you don’t
want to be creating lots of dust to breathe in or to accidentally
ignite.
- Measuring
scoop or similar, glass container with tight lid (small jelly jars are
good), and stirring rod.
Cold Mix
Japanning Recipe:
- Add
2 parts linseed oil, 5 parts turpentine, and 3 parts asphaltum powder
to your glass jar. I used an old soup spoon for measuring and it made
about 1.5” worth of mix in a small jelly jar. A little of
this mixture
goes a long way. You may also want to experiment with these proportions
to improve or alter the mixture.
Note: I recently received the following e-mail that suggests adding rosin
to the mix:
”Hi,
I have been experimenting with the info you gave on the oldtool site. I
found the ford paint restoration info and noticed the formulas had some
rosin in them. I got some from the same place you mentioned from the
asphaltum. I mixed a bottle of your formula, a bottle of the same with
rosin added equal in vol. to the asphaltum,
and a bottle where I tried to
melt the rosin and asphaltum together with heat. With the third I had
the
same problem you had with the asphaltum congealing into a blob. I let
all
3 sit for several days and found the rosin dissolved OK in the cold mix.
I painted a band of each formula onto a broken plane bottom and let them
dry for several days. Possibly because my shop is pretty cold the
japanning never dried completely. I got impatient and baked the plane at
400 degrees in a toaster oven for an hour. After cooling the japan was
still sticky so I baked it again at same temp for another 45 min. This
time after cooling the stuff was cured pretty well.
Results: The cold formula without rosin could be marked with a
fingernail. It was pretty smooth and solid black. The cold formula with
rosin was very hard and black and couldn't be marked with a fingernail.
The hot mix with rosin was splotchy but hard and couldn't be marked but
had some little blobs of material scattered throughout.
It seems the cold mix with rosin was the best;
being hard, uniform, and
black. That's what I will continue to experiment with. So far, so good.
The only thing I don't like about the baked on finish is that the heat
seems to discolor the plane metal that isn't japanned. Do you find this
too?
Right now I'm using a carbon dry pigment mixed with a fluid binder on my
fix-up planes. It seems pretty durable and is a lot less trouble. It
shows pits a little more, though.
Thanks for sharing your work! It's what got me going. The premixed "Old
Japanner's Formula" you can buy seems awfully expensive and they say it
doesn't have a very long shelf life.
--Phil”
- Stir the
mixture a bit and cover
 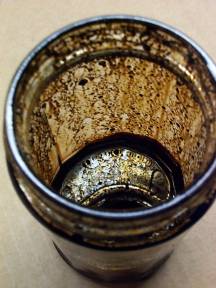
- Let
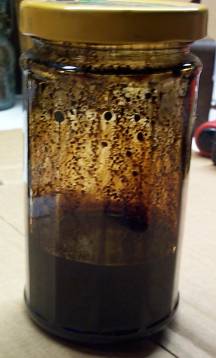
it dissolve for 2-3 days. Stir or shake occasionally. You’ll
notice the
liquid gets progressively darker and more viscous. Pretty soon, after
the jar is tipped, you won’t be able to see through the mix
dripping
down the jar’s insides, and it will take several minutes for
the glass
to begin clearing.
- You
may still have a bit of asphaltum on the jar’s bottom that
doesn’t
dissolve. Don’t worry. It’ll stay there and not on
your brush when you
start painting.
- Test
the mixture’s thickness. Dip a nail or other piece of metal
in the jar.
Take it out and lean it against something so it’s fairly
vertical. Let
the nail dry overnight.
- Check
your test. Did it dry to being slightly tacky? Did the mixture stay put
or did most of the mix drip off the nail’s vertical surfaces?
If the
mixture dripped too much, it may still be too thin and not enough
asphaltum is yet dissolved.
Cold Mix
Application:
- Do
NOT stir before using. That’ll only put any un-dissolved
lumps into
your brush. By this point, the turpentine has probably reached its
capacity for dissolving, and stirring isn’t going to help.
- Use a
good quality brush with soft-bristles, not one of those cheap throwaway
glue application ones.
- Make
sure your iron object is clean, dry and rust free (electrolysis is a
good method). Wipe the object with turpentine to remove any oils, etc.
If there is any remaining japanning on your object, make sure that
it’s
not loose. If it’s thick, consider sanding down the edges of
it or
remove it entirely.
- Prop the
object up on a board so that you can paint as much as possible, and so
that you can move it as needed during drying.
- Dip
your brush, and paint away. I’ve found that a thin coat is
best. Don’t
expect this japanning to fill dings or hide surface imperfections.
Brush it out thinner than you’d do for a regular paint job. A
little
paint on your brush should go a long way.
- Let it
dry a few hours. Make sure it’s in a well-ventilated space or
outdoors.
- If
there’s a second side to be painted, do that now and let it
dry for a few more hours.
- Apply
a second coat of paint. Again, don’t put it on thickly.
Don’t worry
about having too little because even a coat that seems too thin and
brown when wet turns out opaque black after baking. This time, your
paint won’t spread as far. Don’t over brush, or
you’ll start dissolving
the first coat. Clean your brush with turpentine.
- After
drying overnight, the surface should now be relatively dry and only
slightly tacky. You’ll now need a toaster oven and well
ventilated
space (or outdoors).
- Prop
up the iron object so the painted surfaces don’t contact the
oven tray.
Place it on an unpainted side, or support it on its machined surfaces,
screw holes, etc.
- Bake 1
hour at 450F [CAUTION:
my toaster oven may be screwy. That’s why you should do some
test
pieces to see what temperature and time will produce a hard finish.
Most recipes recommend baking at no more than 400F. You should also
check out Nathan Lindsey’s web site about re-japanning a
plane (was at http://www.rusty2l.com/
but no longer there). He uses an incremental method that calls for a
higher temperature with each baking cycle].
If
you put the paint on too thick, it’s now going to start
dripping or
slumping. I’ve had some minor slump into corners, and those
thicker
areas will require that the piece be baked longer in order to cure. Do
what you can to fix any slump, leave it or start over. Following a
baking cycle of increasing temperatures may also help to prevent slump,
but I haven’t experimented with that. A differently
proportioned
mixture might help too. Your test pieces will help you to learn how
much paint should be applied. The few pieces I’ve baked have
all ended
up with a uniform, but not thick looking finish. Rough metal spots,
dents, etc. still telegraph through the coating. The only spots that
seem a wee bit thin on a plane frame that I did are some sharp edges at
a few screw holes. I simply haven’t experimented with this
enough to
know how to create a thicker finish, so if that’s what you
want, buy
pre-made japanning mix.
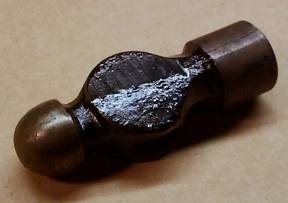
- Let the metal cool, and you’re done. Your
fingernail should NOT be able to
scratch the piece’s surface.
 |
Background
Notes:
This
recipe is based on internet research. I found about 4-5 different
descriptions of japanning, and broke them each down into the
proportions of ingredients used. Some of the archaic ones called for
litharge and other highly toxic stuff. I mostly based mine on one site
containing detailed information on Ford Model T Japan paints.
Most
recipes called for first melting the asphaltum, either with the oil, or
melting it and then adding it to the oil and thinners. I
wasn’t too
keen on that, since all of these materials are flammable. However, I
did try melting a small batch of asphaltum in a tin can, using a
propane torch in my backyard. It melted to a shiny black goo, but I
couldn’t keep even and consistent heat on it. I tried adding
the oil,
but the asphaltum already had begun to solidify. I tried reheating the
mix, but only ended up setting the stuff on fire. After also adding the
turpentine, I finally ended up with an asphaltum paint, but it was very
slow to dry.
I
next tried melting the asphaltum in a short tin can in the toaster
oven. I could only get it to a sticky goo, never more liquid. I
don’t
know if I needed more heat, or if that’s as good as it gets.
I added
the oil first, but the goo was quickly solidifying as it cooled. I then
dumped out the oil, added a bit of turpentine, and tried heating again.
The lump of asphaltum was slow to melt and dissolve. I ended up
eventually adding the full measure of turpentine, all the while
continually heating, but could never get all of the material to
dissolve. I gave up, let it cool a bit, and added the oil. The final
result was a very thick paint. I think the heat drove off a lot of the
solvent. The process was also very messy and dangerous. Needless to
say, both of these methods also made lots of noxious fumes, so working
outside is a must.
Perhaps
the old recipes called for heating because they were working with
chunks of asphaltum, rather than powder, as well as raw linseed oil?
Though heating is quicker than waiting a few days, and gave a final
creamy mixture without lumps on the bottom, it was difficult to control
the quality and results. Plus, it is very hazardous. If you have a
heating plate and a space outdoors to try, it might be worth
experimenting with more, but be careful. Avoid using open flames as
heat. In any event, asphaltum powder dissolves in turpentine relatively
quickly, and you don’t have to worry about losing driers,
causing
fires, and fumes. I didn’t want to risk my neck any more so I
stuck
with the “cold mix method” described above. Is this
recipe as good as
the original used on tools and will it have longevity? I have no idea.
If you
notice some horrendous error in my information, drop me a line at elmoleaf@netzero.com.
If you want to keep experimenting and improve upon this stuff, please
go right ahead, but put your results on the web for others. Feel free
to cut and paste anything from here, since this page probably
won’t be
here forever.
|
